After I wrote an article comparing Ableton Live Lite to Garageband, I received several requests to compare Ableton Live and Cubase. After much hesitation, I finally decided to do this shootout. Let’s go.
Ableton Live and Cubase are two of the most popular Digital Audio Workstation (or DAW) you can find today. Both are world-class professional software used by renowned music producers, artists, and composers.
Some popular music producers off the top of my head that use Ableton Live are Skrillex, Deadmau5, LondonOnDaTrack, and Timbaland.
The most sought after film scorer in the world, Hans Zimmer is an avid user of Cubase. Also, a quote from Paul McCartney I read somewhere suggested that Cubase has been his choice of DAW for years.
Although both DAWs can primarily achieve the same thing, their features and workflow are different. Because of that, they all appeal to different musicians and producers with different goals. So, in this article, I’ll make a head-to-head comparison between Ableton Live and Cubase to help you make a decision on which DAW will fit your needs. Let’s get into it.
Table of Contents
Key Differences between Ableton Live and Cubase: Quick Summary
- Cubase is a DAW that is designed for producing and arranging music. Its tools and features make it easy to arrange, record and edit MIDI and audio. It is mostly used in many traditional recording studios, composers, and film scorers.
- Ableton Live is a DAW designed to produce and perform music live. Its features, sounds, and workflow make it an excellent DAW for electronic music producers and live-performing musicians.
- Ableton is compatible and works seamlessly with a wide range of MIDI controllers compared to Cubase. And this makes it convenient to connect and use some of the most popular MIDI controllers with Ableton without the need to map parameters to the MIDI controller.
- Cubase stock instrument plugins have more organic musical instruments such as pianos, drums, guitars, violins, and a few synths. Similarly, Cubase audio effects are the typical traditional processors you need for mixing and mastering. Ableton Live’s stock instrument and audio effects are more focused on live performance, electronic music and sound design. Because of this, Ableton has more synthesizers and experimental audio effects for sound design.
- Both Cubase and Ableton Live allow users to collaborate. With Ableton Link, musicians can sync the tempos of their DAWs by connecting to the same local network. Cubase has VST Connect 5 and VST Transit that allows musicians in different parts of the world to collaborate over the internet.
Ableton Live
Pros
- It is very easy to map parameters to a keyboard or MIDI controller.
- Ableton Live is very CPU-friendly and doesn’t take much processing power.
- You can combine instrument plugins, audio and MIDI effects and save it as a Rack that can be used in another project. Very useful feature
- Ableton Live’s unique session view is an excellent tool for live performance and trying different musical ideas together.
- Easy to automate buttons and knobs in Ableton
Cons
- It may take a while to fully understand how Ableton works
- Mixing on Ableton is different from any DAW
Cubase
Pros
- MIDI editor makes it very easy to edit and manipulate MIDI notes
- Cubase has a score editor, a very helpful tool for composers and songwriters.
- Cubase’s MixConsole is one of the best mixers in a DAW.
Cons
- It may take a while to learn how to use Cubase
- Cubase requires a lot of computer processing power
If the quick summary didn’t give you as much explanation as you’ll need, then let’s dive in to the head-to-head comparison of all the features both DAWs have to offer.
Overview and Workflow
As I mentioned earlier, both Ableton and Cubase can achieve the same thing. But why should you choose one over the other? I’ll try and capture the summary of the strengths and weaknesses of both of them. So let’s get into it.
Ableton Live

Ableton Live is one of the most intuitive DAWs you will ever use. Once you understand how it works, it’s effortless to make music in it and much faster.
Many electronic music producers are drawn to Ableton Live. That’s because the Ableton company focused on developing software instruments, features, and a unique workflow that is tailored towards electronic music producers.
This doesn’t restrict Ableton to only electronic music. You can produce any type of genre in Ableton and have everything you will need to make music from start to finish. Just know that electronic music producers have an advantage with Ableton.
However, where Ableton Live shines the most and sets itself apart from its competitors is live performance. No DAW out there can compete with Ableton when it comes to live performance. Let me explain some of the cool stuff musicians and production engineers use Ableton for.
Ableton is an excellent tool for DJs who want to make custom arrangements of their songs on stage. How cool is that! Live gigging musicians also use it to play backing tracks to enhance their performance, automate preset changes on their keyboards, multi-effect pedals, drum machines, and more.
If you want to go totally hands-off, you can automate your stage lighting rig and live presentation software all within Ableton.
Cubase

Cubase is your traditional DAW with all the tools you’ll ever need to record, mix, and master a song from start to finish.
It is packed with features that make it easy to compose music, come up with musical ideas and chord progressions, collaborate with other musicians remotely, and more.
The reason why some of the many musicians and producers prefer Cubase is because you’ll save a ton on external instruments and effects. Its audio and MIDI editing capabilities are exceptional. Multi-tracking in Cubase is also much simpler and convenient. More on that later.
Cubase is a good DAW for any genre because Steinberg, over the years, has added new features that will cater to any producer or audio engineer.
It is also a much better DAW to mix music in, compared to Ableton.
You can use Cubase for live performance. But it has a lot of limitations and is not as flexible as using Ableton.
Pricing
Let’s talk about the price difference between Ableton and Cubase. Cubase is the winner in this category because it’s much cheaper than Ableton.
Ableton Live
Ableton Live comes in three editions — Intro, Standard, and Suite. And here are their price points.
- Ableton Live Intro – $99
- Ableton Live Standard – $449
- Ableton Live Suite – $749
Ableton Live Intro is a good starting point for beginners who want to learn how to use Ableton. I wrote an article explaining some of its features as well as its limitations. Feel free to check it out here.
Ableton Live Suite is the best Ableton has to offer. It comes with all the features, instruments, effects, and sound packs Ableton has to offer. Once you master Ableton’s workflow, investing in Ableton Live Suite is something you should definitely consider.
And then there is Ableton Live Lite. This is a free edition of Ableton. It’s not available as a license you can buy. Live Lite comes bundled with some of the most popular music production gears. When you purchase Focusrite’s Scarlett 2i2 Audio Interface (on Amazon) or Akai MPK Mini MK3 (also on Amazon), you get a free license of Ableton Live Lite.
It’s also a good entry point for beginners who want to learn Ableton. Personally, I got started using Ableton using a free copy of Ableton Live Lite, and then later upgraded.
Cubase
Cubase also comes with three versions — Elements, Artist, and Pro. Here are their individual prices.
- Cubase Elements – $100
- Cubase Artist – $338
- Cubase Pro – $538
Cubase Elements is the entry-level license most people start with. Although it has some limitations when compared to Artist or Pro, it’s still a decent DAW with all of the essential features you’ll ever need to produce a full song.
Cubase Pro is the best version Steinberg has to offer. It comes packed with all of the features, instruments, effects, and sounds Cubase has. If you want to take your music production to the next level, Cubase Pro has all you need to make that happen. But if you are a beginner, Cubase Elements should be good enough for you.
Cubase also has two free versions called Cubase LE and AI. Cubase LE comes bundled with some music production gears made by third-party companies. TASCAM US-322 Audio Interface (on Amazon) comes bundled with a license of Cubase LE.
Cubase AI, on the other hand, comes bundled with Steinberg’s very own products and products from their partners, Yamaha. It gives you some extra features you wouldn’t get in LE and is also free. When you buy Yamaha Steinberg UR22 MKII Audio Interface (on Amazon), you’ll get a free copy of Cubase AI.
Stock Instruments and Sounds
Here are the software instruments and the sounds you get with Ableton and Cubase
Ableton Live
Ableton Live Intro comes with only four software instruments. With the Standard edition, you get five software instruments. And the Suite edition gives you 15 software instruments. Obviously, you will have more instruments to choose from with Ableton Live Suite.
Although some of Ableton’s instruments are modeled after acoustic instruments, most of them are synthesizers. And they are some of the best synthesizers you will find in a DAW. Check out my article where I talked about some of the best Ableton stock instrument plugins if you want to learn more about Ableton instruments.
This is a plus for EDM producers because electronic music relies heavily on synths. However, if you make music that relies on acoustic instruments such as pianos, guitars, organs, and more, you won’t have many options in Ableton.
Some of the most useful instrument plugins you will find in Ableton are the Sampler, Drum Rack, Wavetable, Analog, and Operator.
Ableton doesn’t only come with instruments. There are additional presets and samples to help you make music much faster. Here are the total number of sounds you will get in the three Ableton Editions
| Edition | Sounds | Size |
|---|---|---|
| Ableton Live Intro | 1500+ | 5Gb+ |
| Ableton Live Standard | 1800+ | 10Gb+ |
| Ableton Live Suite | 5000+ | 70Gb+ |
These sounds include loops, drum and instrument racks, instrument presets, and one-shots. Now let’s talk about Cubase.
Cubase
Cubase Elements comes with only three instruments, and Cubase Artist and Pro come with eight. That may not seem like a lot compared to Ableton, but there is a reason for that.
One of Cubase’s popular VST instruments is Halion. This is Steinberg’s flagship synthesizer and multi-sampler. You will find Halion or its scaled-down version, Halion Sonic SE, in every Cubase version. And this is an instrument that has it all.
From synth patches to acoustic, percussive, and wind instruments like pianos, organs, violins, flutes, horns, marimba, and even drums, Halion has it all. It comes with different libraries categorized strategically to make it easy to find whatever sound you are looking for.
Cubase also has dedicated synthesizers, electric guitar, bass, and drum instrument plugins. This allows you to tweak any preset to your taste or create your own from scratch.
Here are the total number of instrument sounds you’ll get with the different Cubase versions
| Version | Instrument Sounds |
|---|---|
| Cubase Elements | 1000+ |
| Cubase Artist | 2600+ |
| Cubase Pro | 3000+ |
These sounds include drums, loops, instrument samples, one-shots, and instrument presets.
MIDI
Ableton has some of the best MIDI integration and composition features you’ll ever find in a DAW. However, Cubase has even more to offer and is definitely the winner. You’ll find out why in a moment.
Ableton Live
One thing I like about Ableton is, it integrates really well with many MIDI controllers. While many other DAWs require you to manually map your MIDI controller’s buttons, knobs, and faders, Ableton automatically maps MIDI controllers to important parameters like transport controls, volume and panning, and more.
There are also multiple MIDI effects to choose from. Ableton Live Intro and Standard provides you 8 MIDI effects. And you get 17 MIDI effects with Ableton Live Suite. Some of the most useful MIDI effects are the Arpegiattor, Melodic Steps, Chords, Expression Control, and Pitch.
Ableton’s MIDI effects are one of the best ways to get inspiration for your next project if you have writer’s block. Another great thing is, you can stack multiple MIDI effects up in a rack to give you crazy ideas you wouldn’t have otherwise come up with yourself.
Ableton’s Multi-Clip Editing feature allows you to select multiple MIDI Clips and edit them all at the same time. This makes it easy to sync multiple instruments together much faster. You can edit up to eight MIDI clips at the same time.
And then, there is this feature in Ableton called Capture MIDI. When turned on, Ableton records every MIDI note you play, behind the scene. You can recall every note and chords you have played without recording. With this feature, your ideas never go missing.
Cubase
There are only a few MIDI controllers on the market that integrate very well with Cubase. Because of this, you have to manually map your MIDI controller’s parameters to Cubase’s parameters. This can be very time consuming and uninspiring.
However, there are a few MIDI controllers made to work with Cubase. The best MIDI controller available today that works flawlessly with Cubase is the Nektar Panorama P4 MIDI Controller (on Amazon). It was intentionally made to work seamlessly with Cubase, so the integration is very solid.
Besides the few Cubase-dedicated MIDI Controllers available, which is a downside, Cubase provides all of the MIDI features in Ableton and even more. Surprisingly, most of these features were built into Cubase a long time ago. But people didn’t know about it.
Firstly, Cubase also provides you with MIDI effects. There are 18 MIDI effects. However, they are only available in the Artist and Pro version. There are no MIDI effects in Cubase Elements.
Secondly, Cubase has a similar feature to Ableton’s Capture, and they call it Retrospective Record. And it works the same — records everything MIDI notes you play behind the scenes, even when you are not recording, and then recalls it when you need it.
You can also edit multiple MIDI clips all at once in Cubase. By selecting multiple MIDI data and then double-clicking on it, all of these MIDI clips will be open in one MIDI editor, so you can edit them easily.
Cubase also allows you to convert MIDI data into sheet music. This is particularly useful if you need to provide sheet music for a session musician you are recording.
Obviously, there are so many MIDI editing features built into Cubase, and I’ve barely scratched the surface.
Recording

One of the most important aspects of making music is recording audio. So we must consider how both of these software handle recording.
Ableton Live
Recording in Ableton is an effortless process. Once you have your audio interface and microphone set up, all you need to do is select your input, arm the audio track, and hit the record button.
Previously, Ableton had no comping feature. But recently, they just added it, and it has fixed a big issue that many Ableton users had.
Cubase
Cubase has been the standard DAW for recording audio for many older generation studio engineers, and it always gets the job done.
It’s easy to record in Cubase, just as it is in Ableton. And Cubase’s comping feature is much more refined because it has been improved over time.
In both DAWs, you can record multiple tracks at the same time. Your only limit is how many inputs you have on your audio interface.
Audio Editing and Manipulation
I think this is also a big part of producing music these days. Audio editing is very important if you want to clean up your recording or chop samples for creative purposes. Both Cubase and Ableton are known to be very powerful when it comes to audio editing and manipulation.
So let’s take a look at some audio editing features both DAWs have. In my opinion, there is no winner here because they offer similar audio editing features.
Ableton Live
Editing audio in Ableton is as easy as it can get. To edit any audio you have recorded or imported onto an audio track, simply double click it to open the audio editor. From there, you can zoom in, select a portion of the audio you want, delete, copy, cut, replace, and do whatever it is you want to do.
Ableton also has complex time-stretching algorithms that allow you to time stretch audio without noticing any audio degradation.
Another audio editing feature that gave Ableton all the hype is its warping feature. This feature allows you to time-stretch parts of the audio. But why is this useful?
It allows you to match any audio to the tempo of the project you are working on. It also allows you to quantize audio to the grid. This is particularly useful for correcting the mistakes of a bad musical performance.
One of the reasons why EDM and hip-hop producers love Ableton is how easy it is to chop samples in the audio editor. Once you load a sample in an audio track, you can chop it up easily into a Drum Rack and trigger the chopped samples with a MIDI controller or keyboard.
Cubase
Similarly, Cubase has all of the features I’ve talked about that Ableton provides.
Double-clicking audio in Cubase will open it in the audio editor, and you can edit however you want from there. Cubase also provides you with complex time-stretching algorithms, and they work the same way as Ableton’s algorithms.
Cubase also provides a complex time warping feature in Cubase Pro, allowing you to quantize audio and time-stretch specific parts of the audio.
Chopping samples in Cubase is also very easy. You can either do it in the audio editor or use Cubase’s flagship drum machine plugin, Groove Agent.
Automation
Automation is the number one feature in any DAW that allows you to add dynamic changes to a song. These days, automation has become a necessity in most genres, especially EDM.
Automating in both DAWs is quite straightforward, to be honest. Cubase is, however, one step ahead.
Ableton Live
You don’t have to do any menu-diving to automate a parameter in Ableton. Pressing A on your keyboard will activate Automation in Ableton.
Almost every button, knob, or fader in Ableton can be automated. To automate a parameter, you simply click on it once. Its automation curve will be shown on the track in Red. From there, you can draw in your automation curve. You can also record automation by manually controlling the knob while recording.
Another exclusive feature in Ableton is Macros. With macros, you can assign multiple knobs to a single macros knob. Once you automate that single macros knob, all of the assigned parameters to that knob will automate as well.
The macros feature is very useful when performing live with Ableton. DJs are the ones who usually make use of this tool to add multi-effects to audio with one knob.
When it comes to automation, the downside of Ableton is automating MIDI parameters such as modulation and pitch bend is not as intuitive.
Cubase
Automation in Cubase is also quite easy, but not as simple as it is in Ableton. But once you learn it, it’s effortless.
Similarly, you can record automation in Cubase by manually controlling the parameter with a MIDI controller or mouse.
Unlike Ableton, you can add automation lanes for midi parameters such as modulation, pitch bend, and more in the MIDI editor. This makes it effortless to automate these parameters very fast without menu-diving.
Mixing and Mastering
Cubase is the clear winner when it comes to mixing and mastering. It’s a no-brainer. Many producers create songs inside Ableton and then mix and master it in another DAW such as Logic Pro, Pro Tools, or Cubase. Here is why.
Ableton Live
You’ll get 21 audio effects in Ableton Live Intro, 34 effects in Ableton Live Standard, and 55 effects in Ableton Live Suite.
Once you learn and master the stock Ableton plugins, they can be all you’ll ever need to mix and master a full song. However, if you want to mix in Ableton, I highly recommend you get the Suite edition. That’s because you’ll have multiple audio effects to choose from.
Ableton doesn’t have a dedicated mixer like most DAWs. To add audio effects to any track, you simply drag the effect and drop it on the track. It’s as simple as that. This is quite helpful because it saves you a ton of time with routing tracks in a mixer. And most beginners get confused with audio routing pretty fast.
The downside with Ableton not having a dedicated mixer is, once you’re done creating, it’s quite difficult to mix many tracks at once. Scrolling through hundreds of tracks during the mixing process can be time-consuming.
Cubase
You get 47 audio effects with Cubase Elements, 60 audio effects with Cubase Artist, and 79 audio effects in Cubase Pro.
These are more than enough audio effects to fully mix and master an entire song in Cubase. And Cubase stock audio effects are incredibly good; you may not have to buy any external effects once you master them.
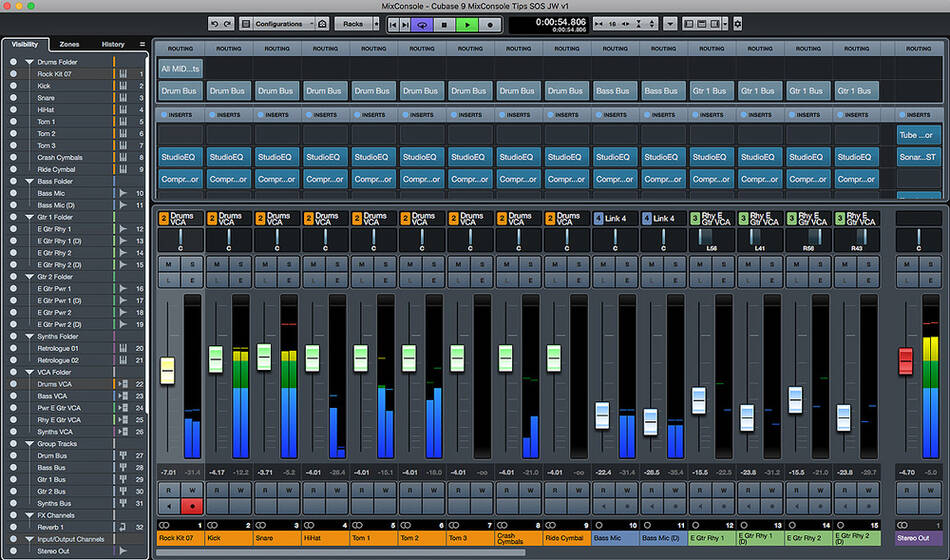
Unlike Ableton, Cubase has a dedicated mixer, and trust me; it’s incredibly good. This is one of the biggest benefits Cubase has over Ableton.
Cubase’s Mixer looks like your traditional mixing console with effect inserts. You can add up to 8 effects per channel in Cubase Elements and up to 16 effects per channel on Cubase Artist and Pro.
One great mixing feature I love about Cubase is Snapshots. With Snapshots, you can save different mixing versions you have done in one project. This allows you to quickly revert back to a mix version you did in the past, and Snapshot is also great for comparing multiple mixes to choose the one you like.
In fact, there are dozens of reasons why you should choose Cubase over Ableton if you care so much about mixing and mastering, I can’t lay it all down here.
CPU
When choosing a DAW, its ability to use your computer’s CPU efficiently is something you should definitely consider. A CPU friendly DAW will allow you to load more software instruments and audio effects and prevent the software from crashing when you’re producing. That’s extremely important.
Ableton is the winner when it comes to how it handles CPU compared to Cubase. Let me explain.
Ableton Live
Ableton is one of the most CPU Friendly DAWs available today. It was carefully designed to ensure it puts less stress on your computer’s processor.
Ableton used fewer graphical elements in designing the software instruments and audio effects in an effort to reduce the CPU load. And it worked. More often than not, Ableton gets criticized for its ugly plugin design, but they did that for a reason.
Cubase
Cubase is not that CPU-Friendly, to be honest. Several tests have been conducted to compare how well Cubase handles CPU to other DAWs. And it usually performs poorly.
Although everything about Cubase is excellent, the company hasn’t focused on optimizing Cubase’s performance. This means if you decide to use Cubase, you should have a much powerful computer, or else you may experience software crashes and CPU overload spikes.
Unique Features of Ableton Live
Here are some features exclusive to Ableton that you won’t find in Cubase.
1. Session View
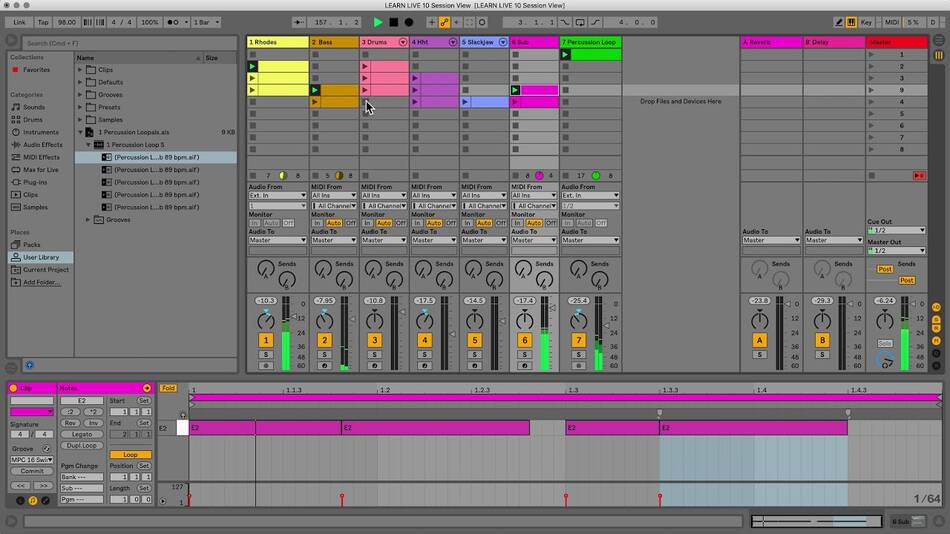
One thing that makes Ableton stand out from almost every DAW is the Session View. This view allows you to create loops and then combine them together into a full song. It’s the view that many electronic music producers use to come up with song arrangements.
Session View is used by live-looping musicians such as FKJ, Rachel K Collier, and Neon Vines. Check out this video of Neon Vines performing “How Deep Is Your Love” by Calvin Harris & Disciples in Ableton’s Session View. It’s also used by DJs and live gigging musicians to play backing tracks and stems during live performances.
2. Racks
Racks is also another feature in Ableton that makes it stand out from its competitors. But what are they?
Racks allow you to combine midi effects, instruments, and audio effects into a single device that can be saved and reused. Think of it this way. With racks, you can add effects like EQ, chorus, delay, and reverb in a signal chain; whether in series or parallel, it doesn’t matter, you can do that. Once you are done, you can save it as a single device and use it later.
There are four types of racks in Ableton — MIDI Effect Rack, Audio Effect Rack, and Instrument Rack and Drum Rack.
3. Max for Live
Max for Live (or M4L) is a game-changer for making music in the digital era. It’s a platform that allows you to build your own devices that work seamlessly with Ableton Live.
For instance, you can build a MIDI effect that receives the weather information and use that to control the cutoff filter of a synthesizer. Crazy right? Let me give you another example. There is a Max For Live device called LFO. This a simple LFO device that can be mapped to literally anything in Ableton. You can modulate Ableton’s Master Tempo with this LFO device.
There are literally hundreds of Max For Live devices made by Ableton’s large community of users, mostly free, and a few of them up for sale. And the thing about Max For Live is that if you have little knowledge of coding, you can make your own devices.
Unique Features of Cubase
Here are some features exclusive to Cubase
1. Control Room
Cubase’s Control Room feature allows you to create up to four separate stereo mixes for the musicians you are recording. Many studio engineers, back in the day, relied on hardware mixing consoles to achieve this. But with this feature built into Cubase, you don’t need that.
You can do separate mixes for the musicians you are recording in Ableton as well, but the process is not as intuitive.
2. VST Connect
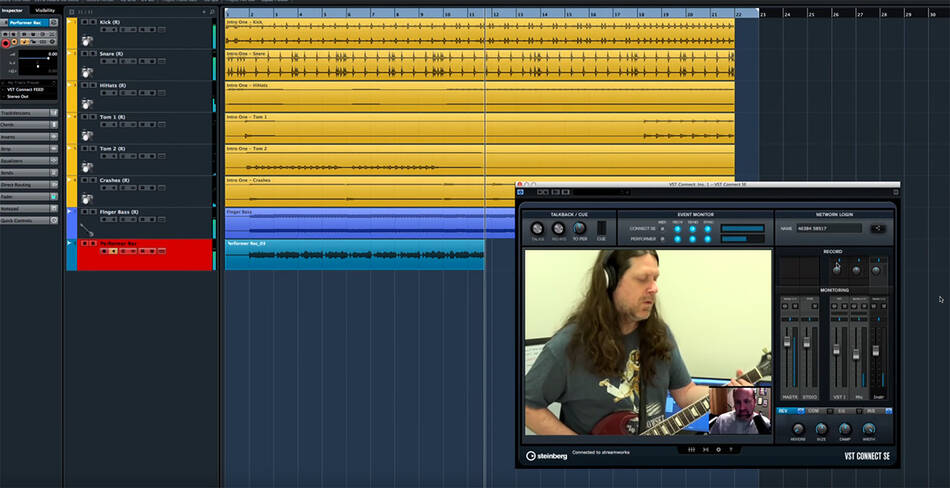
VST Connect is an excellent feature that makes it possible to collaborate with other musicians and music producers remotely.
With this feature, you can set up a remote session between you and a musician via the internet, set their monitoring levels, and record them directly in Cubase as they perform. It even supports video calls, which makes it extremely easy to communicate your ideas to the performing musician.
Which one is best for you? My Opinion
I think, for the most part, I’ve covered the essential features you need to know about Ableton and Cubase. And I’m sure you have made a choice already. However, here is my two cents.
If you produce hip-hop or electronic music such as House, Techno, Trance, Dubstep, and more, you should definitely choose Ableton Live over Cubase. That’s because Ableton’s features and devices are built to work in favor of electronic music producers.
Also, if you are a DJ, live-looping musician, or an instrumentalist who is looking for software for live performance, Ableton is an excellent choice because it has so many features for live performance.
However, if you produce orchestral music, heavy metal, country, reggae, blues, jazz, gospel music, RnB, or any music that requires recording live instruments, Cubase is a much better choice compared to Ableton.
If you are a mix engineer looking for an excellent software mix and master songs, you should definitely consider Cubase over Ableton.
Cubase will give you a wide selection of sounds that fits many genres and give you all the tools you need to produce, mix, and master a song from start to finish.
Conclusion
We have covered a lot in this article, and I hope you picked up much information that will help you make a decision on which DAW to choose. If you found this article helpful, don’t forget to share.

Hi, I’m Raymond. A keyboard player, music producer, and writer. And I’m also the founder of this blog. As someone who has been working with several audio and music equipment and different musicians for many years, my goal is to answer all your questions on music and equipment, as well as the latest music software and technology. For more info, check out my about me page